


Most online applications need to send emails - not just to external users but also to internal users or stakeholders.
You can use an external service for this, however, there are times when you can't (or don't want to) outsource it.
This post outlines a serverless approach to sending outbound HTML emails from your application that you can build upon and modify to suit your needs. It provides an HTTP API that you can call from anywhere in your application, queueing the emails up to be processed by Lambda and delivered by Simple Email Service (SES).
How it works
This is how things fit together:
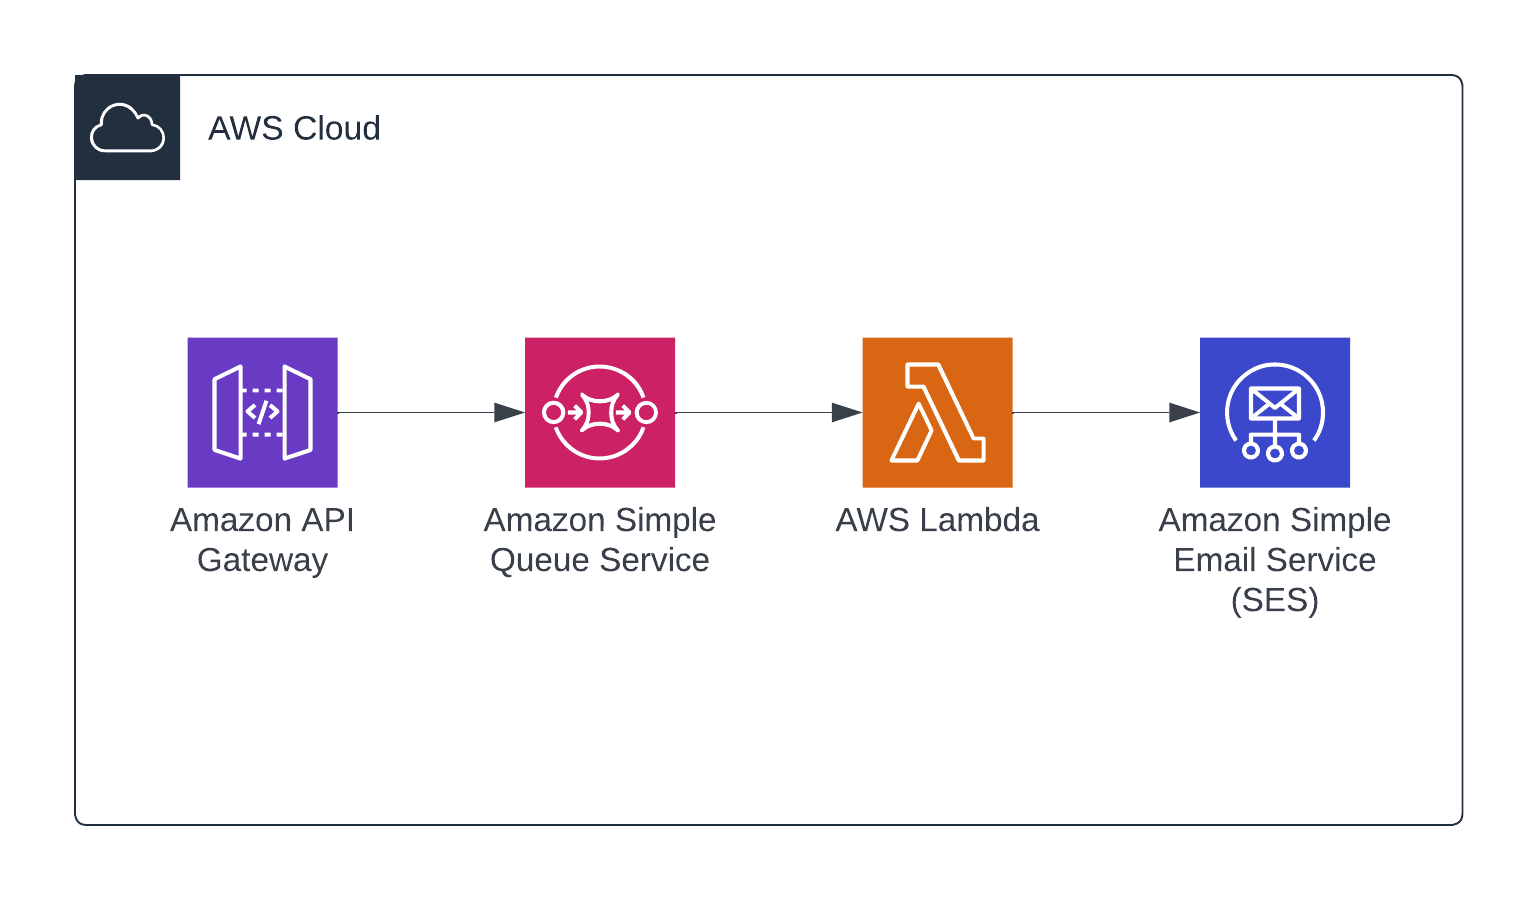
We have an API provided by API Gateway which will accept external requests and place them on an SQS queue.
The SQS queue is configured to invoke a Lambda function which will read the requests, generate the HTML email content, and call SES to send the email to the recipient.
Creating the project
If you want to see the entire project, you can check it out on Github.
Feel free to clone it and skip to the deployment section if you don't want to work through each step.
If you want to do it yourself, there are 3 steps that we'll talk through. They are:
- Create main SQS queue, the Lambda resource and permissions with the AWS Solutions
aws-sqs-lambdaconstruct. - Create the API Gateway with some input validation and integration with SQS.
- Write the Lambda function's code to generate HTML emails and send them via SES.
For each step, we'll write tests first, then write the code to satisfy the tests.
Prerequisites
You'll need the AWS CDK installed and configured on your machine. If you don't have this already, follow these instructions to get set up.
To send outbound emails with SES, you also need to verify that you own the 'From: ' address. To do this, follow these instructions from AWS.
Generate a CDK app
The first thing we need to do is initialise a new application. So we create a new directory called cdk-apigw-sqs-lambda-ses and run cdk init app from within this directory.
$ mkdir cdk-apigw-sqs-lambda-ses && cd cdk-apigw-sqs-lambda-ses
$ cdk init app --language javascript
This creates the project and structure, which should now look like this:
% tree --gitignore
.
├── README.md
├── bin
│   └── cdk-apigw-sqs-lambda-ses.js
├── cdk.json
├── jest.config.js
├── lib
│   └── cdk-apigw-sqs-lambda-ses-stack.js
├── package-lock.json
├── package.json
└── test
    └── cdk-apigw-sqs-lambda-ses.test.js

3 directories, 8 files
SQS
To create the SQS queue we're using a construct from the AWS Solutions library.
We get a lot out of the box with this construct; an SQS queue that will invoke Lambda as it fills, a dead-letter queue for failed items, and a Lambda with correct IAM permissions.
To install the construct into the project, just use npm:
npm install -s @aws-solutions-constructs/aws-sqs-lambda
With that installed, we'll start with some tests to check for success as we build up the stack. We might remove the construct later if we need customisation that isn't provided by the construct. Having the tests here will give us some confidence that we're not breaking things when/if we have to refactor.
// test/cdk-apigw-sqs-lambda-ses.test.js

const cdk = require("aws-cdk-lib");
const { Template, Match } = require("aws-cdk-lib/assertions");
const CdkApigwSqsLambdaSes = require("../lib/cdk-apigw-sqs-lambda-ses-stack");

describe("In the output stack", () => {
  const app = new cdk.App();
  const stack = new CdkApigwSqsLambdaSes.CdkApigwSqsLambdaSesStack(
    app,
    "MyTestStack"
  );
  const template = Template.fromStack(stack);

  describe("the SQS queue", () => {
    test("is created with visibility timeout", () => {
      template.hasResourceProperties("AWS::SQS::Queue", {
        VisibilityTimeout: 300,
      });
    });
  });

  describe("the IAM policy", () => {
    test("allows access to SQS", () => {
      template.hasResourceProperties("AWS::SQS::QueuePolicy", {
        PolicyDocument: {
          Statement: Match.arrayWith([
            Match.objectLike({
              Action: Match.arrayWith(["sqs:SendMessage"]),
              Effect: "Allow",
            }),
          ]),
        },
      });
    });
  });
});
In this case, we're using Template.hasResourceProperties() to test that two things exist in the output template. The first is an SQS queue (AWS::SQS::Queue), and the second is a queue policy (AWS::SQS::QueuePolicy) that allows the sns:SendMessage action.
Next, we'll use @aws-solutions-constructs/aws-sqs-lambda to create the SQS queue and a Lambda function resource.
// lib/cdk-apigw-sqs-lambda-ses-stack.js

const { Stack, Duration, Aws } = require('aws-cdk-lib');
const { SqsToLambda, SqsToLambdaProps } = require("@aws-solutions-constructs/aws-sqs-lambda");
const iam = require('aws-cdk-lib/aws-iam');
const lambda = require('aws-cdk-lib/aws-lambda');

class CdkApigwSqsLambdaSesStack extends Stack {
  /**
   *
   * @param {Construct} scope
   * @param {string} id
   * @param {StackProps=} props
   */
  constructor(scope, id, props) {
    super(scope, id, props);

    // https://docs.aws.amazon.com/solutions/latest/constructs/aws-sqs-lambda.html
    const sqsToLambda = new SqsToLambda(this, 'SqsToLambdaPattern', {
      lambdaFunctionProps: {
        runtime: lambda.Runtime.NODEJS_16_X,
        handler: 'lambda.handler',
        code: lambda.Code.fromAsset(`src`)
      },
      queueProps: {visibilityTimeout: Duration.seconds(300)}
    })

    sqsToLambda.lambdaFunction.addToRolePolicy(
      new iam.PolicyStatement({
        effect: iam.Effect.ALLOW,
        actions: [ 'ses:SendEmail' ],
        resources: [ `arn:aws:ses:${Aws.REGION}:${Aws.ACCOUNT_ID}:identity/*` ],
      })
    )
  }
}

module.exports = { CdkApigwSqsLambdaSesStack }
The Lambda is going to need permission to send email via SES, so I added the ses:SendEmail action to the Lambda function's policy using addToRolePolicy().
The last thing we need to do at this stage is to create some empty function code as a placeholder that we can update later.
Create a src/ directory with the following lambda.js file:
// src/lambda.js

exports.handler = async (event) => {};
If all is well you should have some passing tests:
% npm run test

> cdk-apigw-sqs-lambda-ses@0.1.0 test
> jest

 PASS  test/cdk-apigw-sqs-lambda-ses.test.js
  ✓ SQS Queue Created

Test Suites: 1 passed, 1 total
Tests:       1 passed, 1 total
Snapshots:   0 total
Time:        0.36 s, estimated 7 s
Ran all test suites.
API Gateway
API Gateway is the most complex piece of this system to configure, so let's break it down into a few chunks. Here's what we need to build (with the associated Cloudformation resources in parentheses):
- An
/emailendpoint to which we can post a request (AWS::ApiGateway::Resource). - Some input validation on this endpoint to enforce that only valid requests will enter the system (
AWS::ApiGateway::Model). - A backend AWS service integration. This tells API Gateway how to forward inbound requests that hit our
/emailendpoint onwards to the SQS service (AWS::ApiGateway::Method). - An API key for basic authentication (
AWS::ApiGateway::ApiKey).
With that information we can put together some tests:
// test/cdk-apigw-sqs-lambda-ses.test.js

  describe("the API", () => {
    test("API accepts POST request and forwards to AWS service (SQS)", () => {
      template.hasResourceProperties("AWS::ApiGateway::Method", {
        HttpMethod: "POST",
        Integration: { Type: "AWS" },
      });
    });

    test("API has /email path part", () => {
      template.hasResourceProperties("AWS::ApiGateway::Resource", {
        PathPart: "email",
      });
    });

    test("API has input validation", () => {
      template.hasResourceProperties("AWS::ApiGateway::Model", {});
    });

    test("API has API key", () => {
      template.hasResourceProperties("AWS::ApiGateway::ApiKey", {});
    });
  });
With those ready to go, we can start building up the stack.
// lib/cdk-apigw-sqs-lambda-ses-stack.js

    const queue = sqsToLambda.sqsQueue

    const sendMessagesRole = new iam.Role(this, "ApiRole", {
      assumedBy: new iam.ServicePrincipal("apigateway.amazonaws.com"),
    });

    sendMessagesRole.attachInlinePolicy(new iam.Policy(this, "SendMessagesPolicy", {
        statements: [
          new iam.PolicyStatement({
            actions: ["sqs:SendMessage"],
            effect: iam.Effect.ALLOW,
            resources: [queue.queueArn],
          }),
        ],
      })
    );
First, we've created an IAM role. This role can be assumed by API Gateway (apigateway.amazonaws.com) and permits our API to add to the queue created by the aws-sqs-lambda construct earlier.
    const api = new apigateway.RestApi(this, 'API', {
      deployOptions: {
        loggingLevel: apigateway.MethodLoggingLevel.INFO,
        dataTraceEnabled: true
      }
    });
When creating your API, I'd recommend you enable logging like above to enable you to debug issues much more easily.
The next piece to add is the backend integration with SQS.
Integration with SQS
It's not always obvious how to configure the backend integration with AWS services, and you'll often find yourself digging through the docs to understand the AWS API before you are able to create it.
In this case you can see from this documentation that we're trying to make an application/x-www-form-urlencoded POST request with the following query parameters:
Action=SendMessage
&MessageBody=Your+Message+Text
&Expires=2020-10-15T12%3A00%3A00Z
&Version=2012-11-05
&AUTHPARAMS
So in our case we end up with a resource that looks like this:
    /*
    Integration with SQS.
    https://docs.aws.amazon.com/AWSSimpleQueueService/latest/SQSDeveloperGuide/sqs-making-api-requests.html
    */
    const sqsBackendIntegration = new apigateway.AwsIntegration({
      service: "sqs",
      path: `${Aws.ACCOUNT_ID}/${queue.queueName}`,
      options: {
        credentialsRole: sendMessagesRole,
        passthroughBehavior: apigateway.PassthroughBehavior.NEVER,
        requestParameters: {
          "integration.request.header.Content-Type": `'application/x-www-form-urlencoded'`,
        },
        requestTemplates: {
          "application/json": "Action=SendMessage&MessageBody=$util.urlEncode(\"$input.body\")",
        },
        integrationResponses: [
          {
            statusCode: "200",
            responseTemplates: { "application/json": `{"success": true}` }
          },
          {
            statusCode: "500",
            responseTemplates: { "application/json": `{"success": false}` },
            selectionPattern: "[45]\\d{2}"
          }
        ],
      }
    })
Input validation
An input model allows us to create a json schema which we can use to define valid JSON to our API. In this case our API just takes three fields - a schema version, a name, and an email address.
    /*
    {
      "version": "1.0.0",
      "name": "Tom Hill",
      "email": "valid@email.com"
    }
    */
    const inputModel = api.addModel('InputModel', {
      contentType: 'application/json',
      schema: {
        type: apigateway.JsonSchemaType.OBJECT,
        properties: {
          version: { type: apigateway.JsonSchemaType.STRING, enum: [ "1.0.0" ] },
          name: { type: apigateway.JsonSchemaType.STRING },
          email: { type: apigateway.JsonSchemaType.STRING, pattern: "^\\S+@\\S+\\.\\S+$" }
        },
        required: ["version", "name", "email"],
        additionalProperties: false
      }
    })
The endpoint
Next we create the /email endpoint, and this is where we can add in the backend SQS integration and the input validation. Additionally, we can specify that the POST method to this resource requires an API key.
    const email = api.root.addResource("email");
    email.addMethod("POST", sqsBackendIntegration, {
      apiKeyRequired: true,
      authorizationType: apigateway.AuthorizationType.NONE,
      requestModels: { 'application/json': inputModel },
      requestValidatorOptions: { validateRequestBody: true },
      methodResponses: [ { statusCode: '200'}, { statusCode: '500'} ]
    })
The API key
And finally we create the API key.
    const plan = api.addUsagePlan('UsagePlan', { apiStages: [{api, stage: api.deploymentStage}] })
    const key = api.addApiKey('SendEmailAPIKey');
    plan.addApiKey(key)
To get access to the API key, you need to log into the AWS console and view the key under 'API Keys'.
Function code
There are a few different ways of generating HTML emails. In this case we're using MJML to create the HTML and mustache to substitute the variables such as the person's name.
To import MJML and mustache at runtime, we'll need to package them with the code we deploy.
One of the easiest and most straightforward ways of doing this is to install dependencies in a node_modules directory relative to our Lambda code.
To do this, drop into the src/ directory, run npm init to create a package.json, and then npm install mjml mustache:
% npm init
This utility will walk you through creating a package.json file.
It only covers the most common items, and tries to guess sensible defaults.

See `npm help init` for definitive documentation on these fields
and exactly what they do.

Use `npm install <pkg>` afterwards to install a package and
save it as a dependency in the package.json file.

Press ^C at any time to quit.
package name: (src) lambda
version: (1.0.0)
description:
entry point: (lambda.js)
test command:
git repository:
keywords:
author:
license: (ISC)
About to write to /Users/Tom/work/src/github.com/tomhillable/cdk-apigw-sqs-lambda-ses/src/package.json:

{
  "name": "lambda",
  "version": "1.0.0",
  "description": "",
  "main": "lambda.js",
  "scripts": {
    "test": "echo \"Error: no test specified\" && exit 1"
  },
  "author": "",
  "license": "ISC"
}


Is this OK? (yes) yes
% npm install -s mjml mustache
Once this is done you should see that you now have a src/node_modules/ directory with your dependencies installed. These will all get packaged up together and uploaded to Lambda when we deploy.
Ok, now some basic tests for our code. Primarily, we need to know that given valid input record, we can correctly create the parameters required by SES to send an email.
We're going to write that logic in a function called createSesParams which we'll export from lambda.js shortly.
// test/cdk-apigw-sqs-lambda-ses.test.js

const { createSesParams } = require("../src/lambda");
At this point we'll have two tests; one to check that the output from createSesParams is a valid set of parameters for SES, and one to check that this function will only process items from the queue that match the intended schema version.
describe("The lambda function", () => {
  const record = {
    version: "1.0.0",
    name: "Tom Hill",
    email: "example@example.com",
  };

  test("can generate valid SES parameters", () => {
    const params = createSesParams(record);
    expect(params).toMatchObject(
      expect.objectContaining({
        Source: expect.any(String),
        Destination: { ToAddresses: ["example@example.com"] },
        Message: {
          Subject: { Data: expect.any(String) },
          Body: {
            Html: expect.objectContaining({ Data: expect.any(String) }),
            Text: expect.objectContaining({ Data: expect.any(String) }),
          },
        },
      })
    );
  });
  test("rejects records with unknown schema version", () => {
    expect(() => { createSesParams({version: '3.2.1'}); }).toThrow();
  });
});
With the tests in place we can add the following code to our Lambda to process the records that come in from SQS. We need to be able to generate the content in HTML and text, and then wrap that content up in a set of parameters for SES:
// src/lambda.js

const assert = require("assert");
const aws = require("aws-sdk");
const mjml = require("mjml");
const mustache = require("mustache");

exports.createText = (data) => {
  return mustache.render("Hello {{name}}, thanks for stopping by!", data);
};

exports.createHTML = (data) => {
  const content = `
  <mjml>
    <mj-body>
      <mj-section>
        <mj-column>
          <mj-text>
            Hello {{name}}, thanks for stopping by!
          </mj-text>
        </mj-column>
      </mj-section>
    </mj-body>
  </mjml>`;

  const { html: mjmlOutput, errors } = mjml(content, {});
  assert.ok(errors.length === 0, JSON.stringify(errors));

  return mustache.render(mjmlOutput, data);
};

exports.createSesParams = (data) => {
  if (data.version != '1.0.0') { throw('Unsupported version') }
  return {
    Source: "validated_email@yourdomain.com",
    Destination: { ToAddresses: [data.email] },
    Message: {
      Subject: { Data: "Test email" },
      Body: {
        Html: { Data: this.createHTML(data) },
        Text: { Data: this.createText(data) },
      },
    },
  };
};

exports.handler = async (event) => {
  try {
    const promises = event.Records.map(async (record) => {
      const ses = new aws.SES();
      const input = JSON.parse(record.body);
      return ses.sendEmail(this.createSesParams(input)).promise();
    });
    await Promise.all(promises);
    return { status: "success" };
  } catch (error) {
    console.log("ERROR is: ", error);
    return { status: "error", error };
  }
};
Deploy the application to AWS
At this point we are ready to deploy our application and test it end to end.
To deploy the application we need to run cdk deploy and hit yes when asked if you'd like to create resources and allow permissions.
At the end of the deployment you should see some stack outputs listing the URL of your API:
% cdk deploy

<...snip...>

✨  Deployment time: 6.14s

Outputs:
CdkApigwSqsLambdaSesStack.APIEndpoint1793E782 = https://ihv5g6w5hg.execute-api.eu-west-1.amazonaws.com/prod/
Stack ARN:
arn:aws:cloudformation:eu-west-1:483567639850:stack/CdkApigwSqsLambdaSesStack/08a1e840-026e-11ed-b74c-022b857dfce7

✨  Total time: 8.15s
With the application deployed we can run a quick test from the command line with curl like so. Remember to use the API key listed in the AWS console under the API Gateway service.
curl -X POST -H 'X-Api-Key: i94IhdgdRC98LgAStqYJH42r11khnAs44VUQNzSP' -H 'Content-type: application/json' --data '{"version": "1.0.0", "name": "Your name", "email": "your@email.com" }' https://mt8mlyhcak.execute-api.eu-west-1.amazonaws.com/prod/email
{"success": true}
Success! Check your inbox for a new email.
I hope this post has been helpful to you, or if you have any questions or comments, get in touch!